|
What
is a Cpanel?
The
Cpanel control Panel makes setting up and managing your web site easy!
The Control Panel is a user-friendly graphical/text interface that permits
quick and easy access to all the features available to your hosting plan.
The features inside the Control Panel automate processes that users must
do manually with other hosting companies.
A detailed user manual
is avaliable online here http://www.cpanel.net/docs/cp/
See Tutorials here (Quicktime
format) explaining the following topics:
Create
a mail account in outlook express
Creating a POP mail account
Creating an AutoResponder
Creating a default email address
Creating a subdomain
Password protecting a directory
Managing databases with PhpMyAdmin
Creating a MySQL database
Creating Custom error pages
Installing Front Page extensions
How Do I
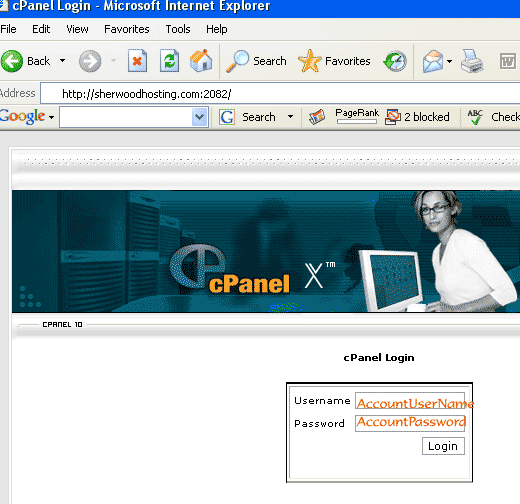
access (login) to my own Cpanel?
Access your Cpanel through your web browser by entering the
URL address:
http://mydomain.com/cpanel
and then enter your hosting account's username and password (this was
emailed to you when you opened your account).
Alternatively, you can go to the SherwoodHosting.com home page and scroll down to the CPanel access there.
From there you will see lots of menu options, some of which are detailed
below.
You will see a login (authentication) window similar to below.
Your Cpanel login user/pass is the same as your account user/pass is the same as your main account master mailbox user/pass.
File Manager
By clicking the File Manager option you can view all the directories
and files in your account,
as well as change permissions for directories and files, create directories,
create
and edit files, and upload files from your hard drive
to your web site.
With this helpful feature, you can get by without any other FTP client
software-- it's certainly useful in an emergency or from behind a firewall. You can also edit files using the File Manager.
Mail Manager/Menu
This option is where you create and edit, change passwords, forward email
to
other email accounts, and create autoresponders for your Pop3 email accounts.
(Quick Note: It is not necessary to create email aliases because your
default email
account acts as a "Catch All Account. In other words anything@yourdomain.com
will be delivered to your default mail account.)
Change Password
Click this option to change the password for your Control Panel and FTP
account access.
Site Statistics
This option will assist you in monitoring visitors to and from your site.
This area features 3 different views of your traffic:
AWSTATS (we prefer-- it's clear and thorough)
Analog,
which basically
provides you with a quick summary.
Webalizer, which provides you with more detailed
information.
Last 300 visitors, with detailed information
on each.
This area also contains a link to access your error
log, which will assist
you in trouble shooting your scripts.
Network Tools
This option provides you with DNS lookup capabilities and traceroute.
FTP Manager
Your Cpanel hosting account comes with a built-in ftp account that is most frequently used for uploading web site files. You use your Cpanel username and password for this main FTP login, and the FTP server is just your domain name (no www. zone prefix).
For any FTP accesses, be sure your own local computer's firewall (or other anti-virus type of protection such as McAfee or Norton) does not block Port 21 (some versions have this as a default to prevent you from using FTP features).
The option to manage your ftp accounts and create new ones is available
for hosting accounts that permit multiple ftp accounts (sub ftp accounts)
and also
those with anonymous ftp. From this menu, you can set up how anonymous
users
are treated, change anonymous policies, view who is currently online
(logged in to your ftp site), and boot off anyone
from their session.
To create a new
ftp account within your domain, go to
Account Settings > FTP Manager > FTP://Accounts
You will see that you have several FTP accounts
already. Do not tamper with these.
To add an account, click on Add Account and
enter the login username and password you'd like to have for this new
ftp account. Files referenced by trasnactions using this account will
be stored in the subdirectory that you name in the Directory field,
by default it is filled in with the login username (and this is a good
way
to leave it for simplicity and for limiting this account's ftp login
access just to this directory).
To use/access the (sub)
ftp account you just created:
Via an FTP client application (program):
Just like your web upload ftp access, you use your own domain name
as the ftp server; the login username you set up in the cpanel process
using the following format: username@mydomain.com; and the password
you entered in the cpanel dialogue box.
Via a web browser:
Use the following (somewhat awkward) syntax as the URL for your access:
ftp://username@mydomain.com@mydomain.com
Note especially the repitition of @mydomain.com (the first part "username@mydomain.com"
tells the browser the login username you want, and the trailing "mydomain.com"
tells the browser your ftp server name)
You can enter your password using the browsers' dialogue box prompt
or you can include it in the URL by inserting your password as follows:
ftp://username:password@mydomain.com@mydomain.com
We do not recommend using this format (unless this is a fairly public
ftp account), since it makes your password more vulnerable than it
needs to be.
SPECIAL NOTE: For http://username:password@domain
For the http protocol, Microsoft has removed the feature to be able to include user information within the URL address as of IE6's security release.
Thus javascript and other client-side means to build or utilize a URL of this type will fail. You'll need to use a server-side solution.
This does not affect ftp or other protocols. |
To
change the password of a (sub) ftp account, go to
Account
Settings > FTP Manager > FTP://Accounts
and click on Change Password corresponding to the account you want to change.
To set
up a "Dropbox" FTP area, click
here for information.
Also see the next section for the related feature: password-protected
directories.
Password-Protected
(Restricted) Directories
Password-protected Directories are Folders within your web site which
have read (web) access restricted to only the users you choose. Access
permission is accomplished through one or more pairs of username-password
sets (technically accomplished via .htaccess). You can only restrict
access at the granularity level of a directory (i.e., not on a per-file
basis).
The
restriction
affects
all
files and
subdirectories within the scope of the protected directory. Password
protected directories are not the way to establish FTP read/write
access (instead create a custom FTP account through the Cpanel> FTP manager;
see example for "dropbox")
The password-protected
directory set-up process is in three steps:
- Create a directory (folder). It's fine if it already exists and contains files and
subdirectories.
- Establish the
password protection: Cpanel> PasswordProtectDirectories>
a. Check the box to enable Password Protection
b. Enter a phrase that will appear for the username-password authentication
window at user sign-in time -- this is a label only and just confirms
to the user what they are about to access. (This aspect is not critical
to the functioning of the protection feature.)
c. SAVE to establish the directory protection, then continue for entering
usernames...
d. Establish one or more Usernames+Passwords for this directory.
Case sensitive.
NOTE: Usernames and passwords MUST be from 6 to 8 characters long. Any less than
6 or greater than 8 will cause your protected directory cease to function and
you will receive an error when trying to enter the directory.
- Access your
directory for
reading (downloading only) via http: web access.
You can use the following URL http syntax to read the protected files
(or
any combination of subtracting password or username, you'll be prompted
if the password (or user & password) are omitted):
http://username:password@mydomain.com/protecteddirectoryname/
If you want to protect only a specific page, you should
first create a special directory or subdirectory for it, put the page
into that folder, and then assign username and password access to the
folder containing your page. (Remember when you start moving pages around
into folders within your web space, you also need to check the URL's
on your other pages and modify them to reflect the new path/s to the
moved pages.)
NOTE:
If you are using FrontPage you must use the special instructions below.
SPECIAL
INSTRUCTIONS FOR FRONTPAGE USERS FOR PASSWORD PROTECTED PAGES
The Password Protect feature modifies the .htaccess file, which you cannot
modify if you are using FrontPage without corrupting your FP extensions
and/or breaking your FrontPage. Here is how to password protect your
directories/pages using your FrontPage authoring tool on your own computer:
Note: A FrontPage sub web and a folder under your domain are basically
the same.
1. First, you will need to create a sub web that you want to protect.
This sub web is the name of the directory you want to protect and CANNOT
exist. Once in FrontPage:
* Select File --> New --> Web
* Click on 'Empty Web' In the text box labeled 'Specify the location of the
new web' put in your complete domain name and the name of the folder or sub
web you wish to create (i.e. http://www.yourdomain.com/folder)
* Then click on 'OK' and wait while you new sub web is created.
2. Now that your new sub web is created, you will need to set the password
protection for this sub web. You should already be in your new sub web.
To verify, look at the URL in the title of FrontPage. To password protect
this sub web:
* Select 'Tools' --> 'Security' -> 'Permissions'
* A 'Permissions' box will appear.
* Click 'Use unique permissions for this web' and click 'Apply'.
* Click on the 'Users' tab in the permissions box. You will see your current
username listed. DO NOT remove this username.
* Click 'Only registered users have browse access'.
* Click 'Apply'.
* Click the 'Add' button
* Fill in the 'Name' 'Password' and 'Confirm Password' text fields and click
'OK'. If you want to add more users just go click on the 'Add' button again
and fill in the new users information.
* Click on 'OK' and the 'Permissions' box should disappear.
Now only
your FrontPage username/password and the user(s) you just set up can
view that sub directory.
Custom Error Pages
This option will assist you in customizing how your error pages look.
It includes:400, 401, 403, 404, 500 error pages
MySQL
Special note:
When you create users and databases via Cpanel, your username is
prepended to the identifier you chose. You must use this concatenated
identifier in any parameters you send to MySQL for processing. Example
code segments for Perl & PHP are shown in the Cpanel when you visit
the MySQL page again- these are very handy tidbits for the MySQL
beginner!
MySQL is a database
management system that you can use with your web site. There are two
separate features in the Control Panel. One allows you to create
your databases
and assign users while the other feature permits you to edit the
database.
A database is a structured collection of data. It may be anything
from a simple shopping list to a picture gallery or the vast amounts
of information
in a corporate network. To add, access, and process data stored in
a computer database, you need a database management system such as
MySQL
Server. Since computers are very good at handling large amounts of
data, database management plays a central role in computing, as stand-alone
utilities, or as parts of other applications.
MySQL is a relational database management system.
A relational database stores data in separate tables rather than
putting all the data in one big storeroom. This adds speed and flexibility.
The tables are linked by defined relations making it possible to
combine
data from several tables on request. The SQL part of "MySQL'' stands
for "Structured Query Language''—the most common standardised
language used to access databases. See mysql.com for
a user manual and more explanations.
Mime Types
MIME = Multipurpose Internet Mail Extensions - This option allows you
to add
Mime Types to your account.
FRONTPAGE USERS - You will have to use FrontPage to perform this function.
Crontab
This option will assist you setting up automated processes (batch jobs).
Entropy Chat
This option will allow you to setup a web based chat on your site.
Shopping Cart
Users can setup a fully customized and completely functional storefront
and
shopping cart on their site with a host of administrative features. Shopping
Carts
are available with all our Hosting Plans. Presently we have Interchange
cart and
Agoria .cgi cart included with your control panel We also recomend City
Shop from Nightmedia.net or Oscommerce from oscommerce.com.
Search Engine Submission
This option will assist you in submitting your URL to many of the popular
search
engines in one click.
Sub Domains
This option will assist you setting up subdomains inside your hosting
plan.
Subdomains are anydomain.yourdomain.com.
The subdomains that are setup through your control panel draw their
resources from the parent plan and do not come with an independant IP
address.
Back up Manager
This feature allows you to compress and backup your directories and files
at
your convienence.
CGI Scripts
This option provides you with easy use of the following pre-installed/configured
scripts:
Random HTML Editor
Guest book
Counter
Clock
Countdown
Formmail
Entropy Search Engine
Chat
Further information pertaining to these scripts can be found in the
CGI Center in your Control Panel.
SherwoodHosting DOES NOT provide technical support for ANY third
party
CGI / Perl / Java / PHP or Fantastico scripts -- these are often free and you would upload and install them at your own risk.
(Web
Page) Redirection (Refer,
URL-forwarding)
The Redirect option allows you to specify where to "forward" an incoming
web address URL. Two examples are:
- You've moved a directory or an entire site (domain name) to another
URL (not just changed hosting companies). The Redirect setting allows
you to refer the incoming URL to go to the right place. You can specify
it once for the entire domain. This is done at the DNS level as opposed
to an alternate method is to use the html head section tag <refer>,
which must be placed in each file to be affected.
- You can "correct" the spelling or upper/lower case of an incoming
URL. For instance, you have a musician's CD portfolio located in a
subdirectory at http://musician.com/cd (lower case). To allow users
to enter either /cd or /CD, you can redirect /CD to /cd.
Here's how you access the settings:
CPANEL> Advanced Menu> Redirects
Then in the left box, type in the subdirectory that the user would type
in as a URL.
In the right box, type in the COMPLETE URL including the subdirectory
as you need it to be.
Choose Permanent (instead of Temporary),
and click on Add.
In the example above, you'd enter in the left box: CD
and in the rightbox: musician.com/cd
assuming that when you set up your directories on your site you named
the cd directory in lower case.
|